Summary
The purpose of this post is to describe a work-around to permit Veeam Backup for Microsoft Office 365 (VBO) – or any other apps which require it – to continue to use Legacy Authentication from a designated, trusted location, while forcing all other accounts to use Modern Authentication.
Licensing Note: We will accomplish this using Azure AD Conditional Access (CA) policies.

CA policies require Azure AD Premium P1 or Azure AD Premium P2 licenses within your tenant, for your users.  Azure AD P1 and P2 are included in the Microsoft Enterprise Mobility + Security E3 (P1) and EMS E5 (P2) licenses, as well as Microsoft 365 E3 (P1) and Microsoft 365 E5 (P2) licenses.  Azure AD P1 or P2 are *not* included in Microsoft 365 Business.
Background
A few months ago, Veeam released Version 3 of its backup solution for Office 365 – Veeam Backup for Office 365 (a.k.a. “VBO”). The long anticipated feature was VBO V3’s ability to make use of Modern Authentication within Azure Active Directory (Azure AD). In theory, this would allow Legacy Authentication to be disabled and make it more secure.
Apparently, Veeam Backup for Office 365 still requires Legacy Authentication to be enabled in order to backup parts of SharePoint Online (SPO) as Microsoft has not provided (as of this writing) Modern Authentication capable API endpoints to do so.
Modern Authentication
Modern Authentication in Azure AD enables your Azure AD tenant to utilize features like Multi-Factor Authentication (MFA) for client applications which support it. It accomplishes this by presenting the client application with an OAuth Token it can use (and reuse) to access your Office 365 online application resources (e.g. Exchange Online).
If you have MFA enabled and have signed into Outlook 365 (2016+) on a desktop, or setup Outlook for Mobile, or even Apple Mail for iOS 11 (or later), you may have noticed the sign-in credentials prompt appears to be a web page presented within the application you are using. This is because it actually *is* a web page, served up by Azure AD and Microsoft Online Services as you would see when you login with a browser. This is done to support Azure AD MFA.
Legacy Authentication
Leaving Legacy Authentication enabled is a security risk because it allows users who have enabled ‘app passwords‘ to bypass the MFA requirement while authenticating. This exposes these accounts to potential unauthorized access.
While going through a security review on an Azure AD tenant, one of the recommended actions was to enable the new, Microsoft-provided Conditional Access policy named ‘Baseline policy: Block legacy authentication (Preview)‘.
The purpose of this policy is to prevent/block legacy authentication sign-ins to Azure AD. Examples are older versions of Outlook and other Office applications, as well as older mobile clients (e.g. the Mail app on iOS devices before iOS 11).
The problem with this baseline policy is it affects everyone within your Azure AD tenant, including the VBO backup account. This would prevent VBO from fully backing up all of the meta data for SharePoint Online and other services.
Disable or Prevent Legacy Auth?
There are ways to Disable Legacy Authentication, they include changing access control settings within the SharePoint Admin portal, or PowerShell commands executed against your Azure AD tenant, but disabling Legacy Auth altogether would prevent VBO from properly and fully carrying out its job.
What if instead we Prevent (block) Legacy Auth for all user accounts *except* the VBO account (as it still requires it)?
The Solution
Instead of enabling the default baseline Conditional Access policy to block all users from being able to perform Legacy Authentication against an Azure AD tenant, let’s setup two (2) new CA policies to prevent all accounts except the VBO account from being able to perform Legacy Auth.
Before we create a any CA policies, if you have not already done so, we must define a Named Location to identify the authentication requests coming from the VBO account and handle them differently from the rest.
Named Locations
In order to identify legitimate sign-in requests coming from your VBO server(s), we must create a Named Location within Conditional Access.
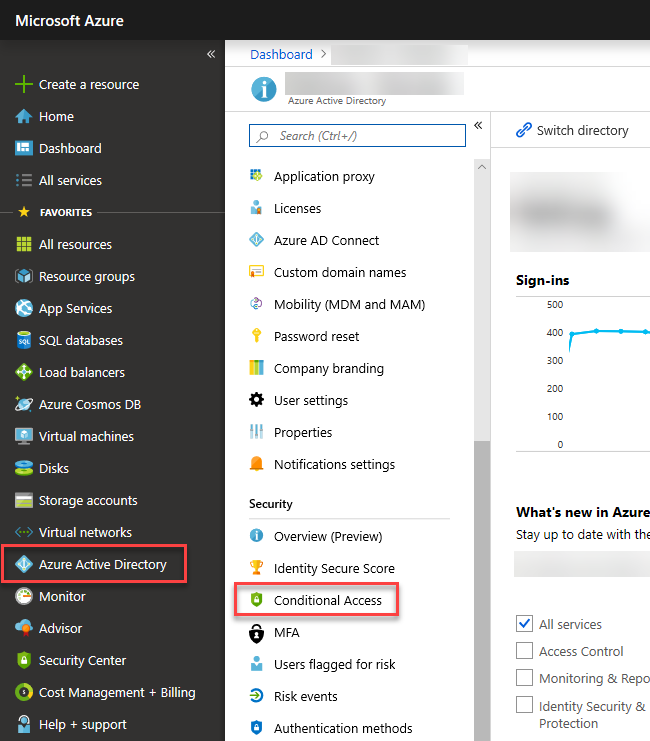
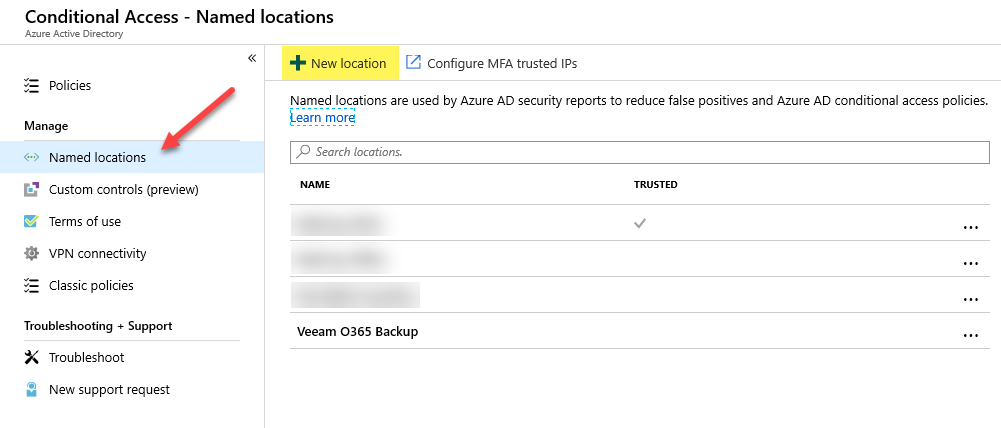
Step 1 – Within the Azure Portal, navigate to Azure Active Directory, then click on Conditional Access, and then click on Named locations.
Step 2 – Click on + New location
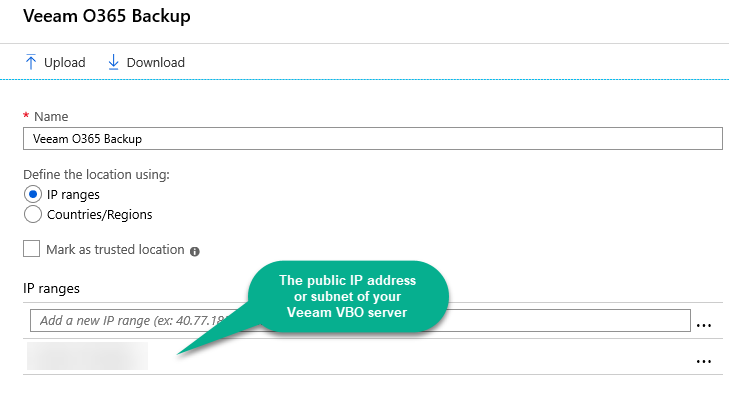
Step 3 – Give your location a name, select IP ranges and enter one or more IP ranges for your Veeam Backup for Microsoft Office 365 (VBO) server(s).
Note: the IP ranges are entered in CIDR notation. For a single IP address, enter it with a trailing "/32" as in: 192.168.101.22/32. Do *not* use a private IP address; the above is just an example. Use a public IP address.
At this point, you have a Named Location you can use within a Conditional Access Policy’s location condition. We will do this next.
Restrict the VBO Account
In order to restrict the VBO (or some other application’s) account to only be permitted to sign-in from a particular location, we need to create a Conditional Access policy to by default, Block access for this user account, except when signing in from the Named Location we created in the previous section.
Warning and Disclaimer: Conditional Access Policies can completely lock you and your organization out of Azure and Office 365.  Neither I nor this site can be held responsible for your, your organization's, or any third-party's actions.

Take extreme care when creating Conditional Access Policies within Azure AD by ensuring to EXCLUDE at least one Global Administrator within your tenant within each policy you create or modify until you are certain the policy will not lock out other administrators or unintended end-users.
Step 1 – Within the Azure Portal, navigate to Azure Active Directory, then click on Conditional Access, and then click on Policies.
Step 2 – Click on + New policy
Step 3 – Provide a name for your policy as I did here.
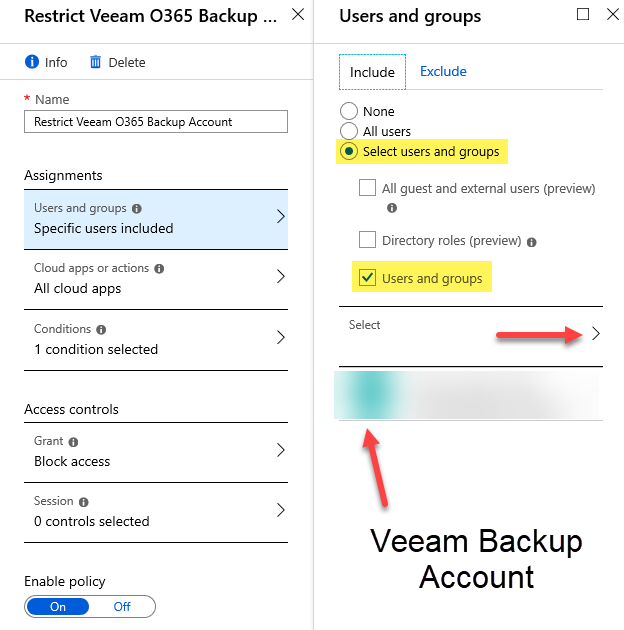
Step 4 – Under ‘Assignments’ click on Users and groups, under the ‘Include’ tab, click on Select users and groups and check the Users and groups check box.
Step 5 – Click on Select as shown by the red arrow in the next screen shot, search for your Veeam VBO Backup Account and add it to the list. Click Done.
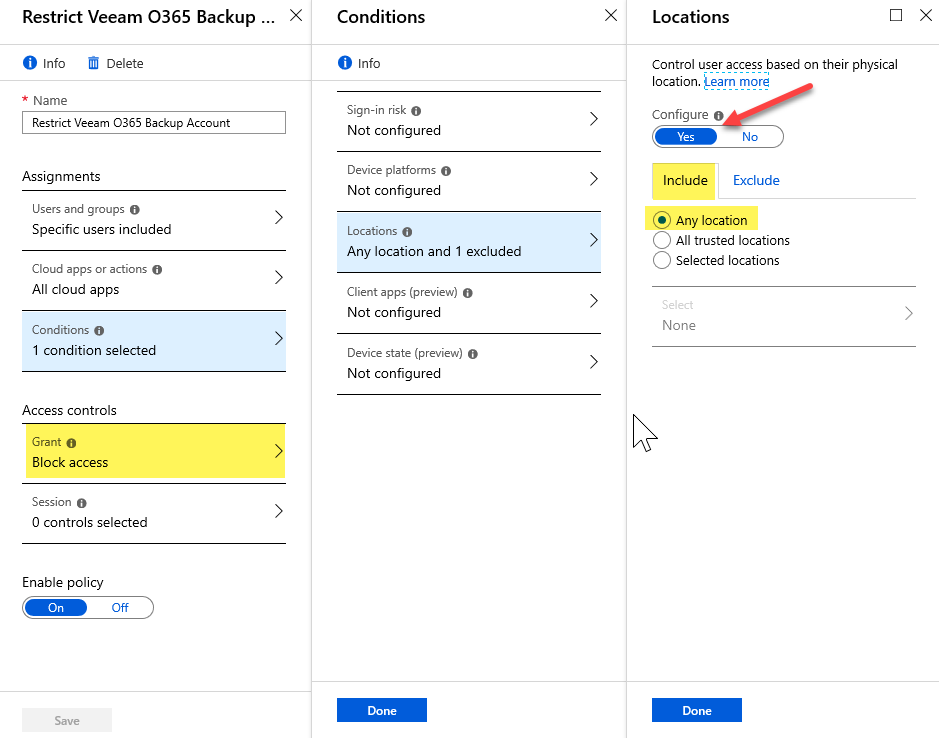
Step 6 – Under ‘Assignments’ click on Conditions, then click on Locations, and click to enable this condition by clicking on Yes under ‘Configure’ as seen in the next screen shot.
Step 7 – Under the ‘Include’ tab, ensure Any location is selected.
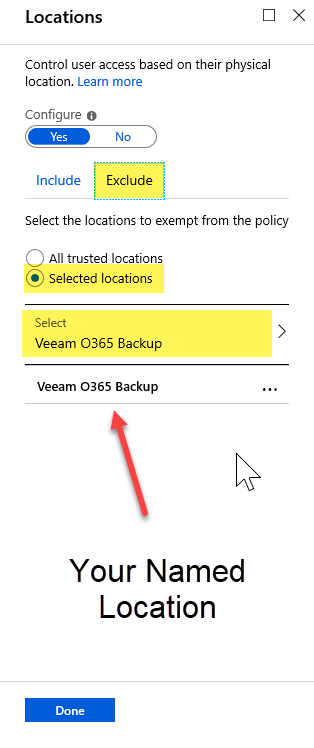
Step 8 – Click on the ‘Exclude’ tab and select the Selected locations option. Click on Select and pick the Named Location we created in the previous section for your VBO server(s). Click on Done. Click Done again.
Step 9 – Important: As per the highlight two screen shots back, under ‘Access controls’ click on Grant and select Block access, then click Done.
Step 10 – Under ‘Enable policy’ select On to enable it and click Done.
You are done setting up the new policy to restrict your VBO backup account to only sign-in from a specific location. Next, let’s block Legacy Authentication for all other user accounts within the Azure AD tenant.
Prevent/Block Legacy Authentication
We are not finished just yet. Let’s accomplish the end goal – Preventing Legacy Authentication for all other user accounts within Azure AD. We will need to create another new CA policy for this.
Step 1 – Once again, within the Azure Portal, navigate to Azure Active Directory, then click on Conditional Access, and then click on Policies.
Step 2 – Click on + New policy
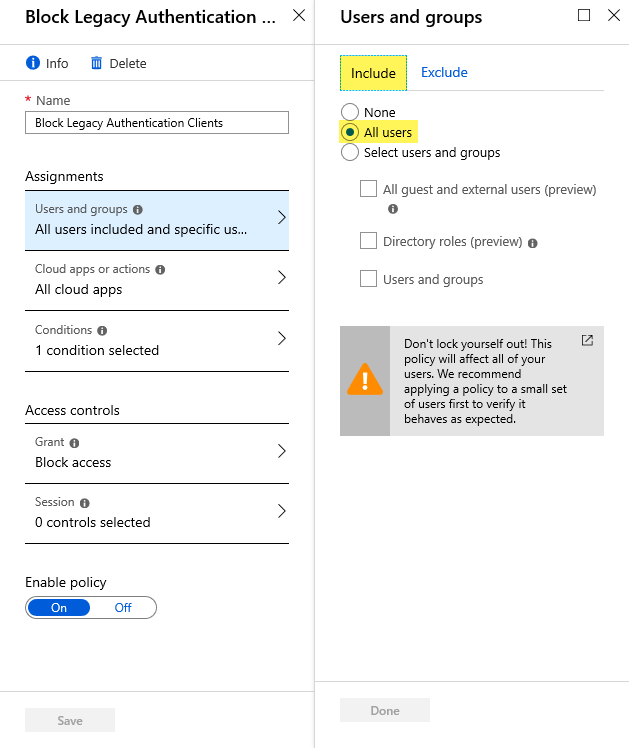
Step 3 – Provide a descriptive name for your policy as I did here (e.g. Block Legacy Authentication Clients).
Step 4 – Under ‘Assignments’ click on Users and groups, under the ‘Include’ tab, click on All users.
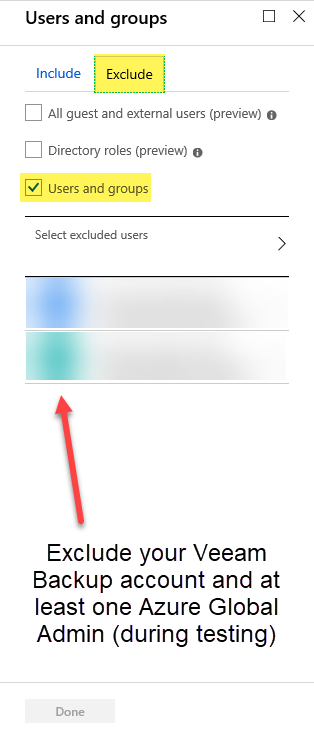
Step 5 – Click on the ‘Exclude’ tab and choose Users and groups, then click on Select excluded users and add your Veeam Backup account along with at least one Azure Global Administrator until you confirm all is good after testing. Click Done to close the panel.
Step 6 – Under ‘Assignments’ click on Conditions, then click on Client apps. Start by selecting Yes under ‘Configure’ to enable this section.
Step 7 – Place a checkbox next to only the following two options (as seen in the next screen shot): Mobile apps and desktop clients as well as Other clients. Now click Done and click Done once again to return to the policy panel.
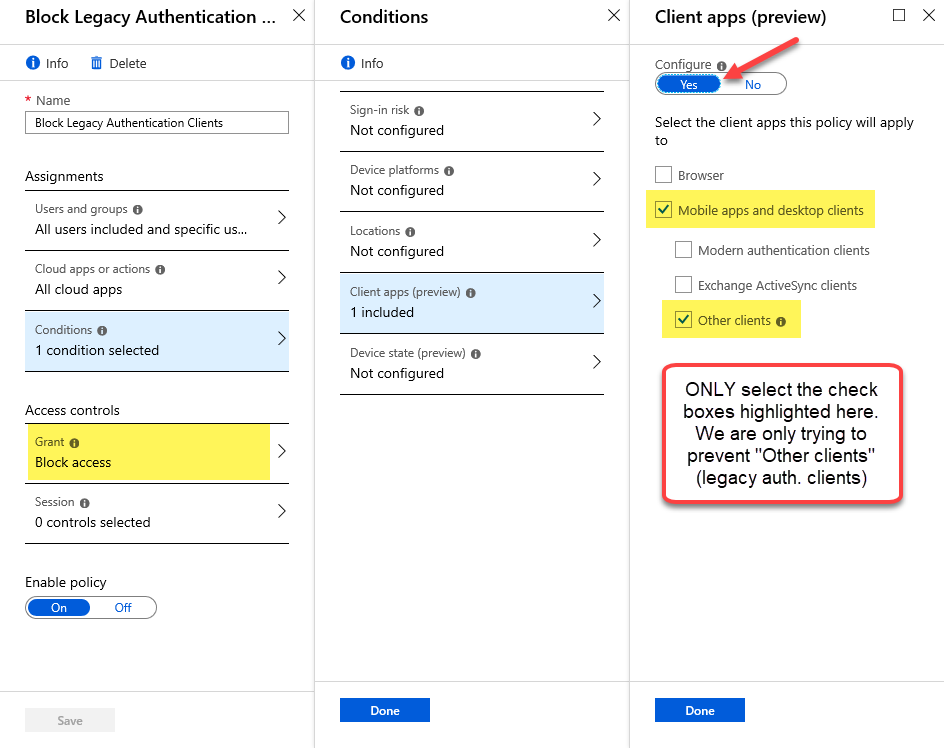
Step 8 – As per the highlight on the previous screen shot, under ‘Access controls’ click on Grant and select Block access, then click Done.
Step 9 – Under ‘Enable policy’ select On to enable it and click Done.
We have finished creating policies. Now we have to confirm and test them.
Confirm
Use the What If tool in Azure AD to test the Conditional Access policies we created. This will allow you to ‘mock’ test based on settings such as User, IP address, etc. whether the rules we created permit or block access to users.
Also, you would want to test everything out for yourself and your end users, as well as the VBO backup account immediately or by waiting for its next scheduled backup interval.
Troubleshooting
If you run into trouble, make sure your Veeam VBO Backup account is *not* included in some other policy within Conditional Access, as this might be preventing it from authenticating as expected. Use the What If tool mentioned in the previous section. Worst case, disable the policies we just created and retest.
Conclusion
I just showed you how to better secure your Microsoft Azure AD tenant by preventing Legacy Authentication from taking place for all user accounts except the Veeam Backup for Microsoft Office 365 (VBO) user account, while restricting the VBO user account to only sign-in from a trusted IP address location.